

Installation
Install the Ordinal MCP server in Claude, Claude Code, Codex, Codex CLI, Cursor, or VS Code, then sign in once with OAuth.
Before you start
You’ll need an Ordinal account with access to at least one workspace. No API keys — the MCP server signs you in through your browser the first time you use it.
How to connect
Pick your AI assistant below for step-by-step instructions.
Claude
Copy the Ordinal MCP server URL
https://app.tryordinal.com/mcpOpen Claude's connector settings

Open in Claude
Add the Ordinal connector
Click Add custom connector, paste the URL you copied, name it Ordinal, and save.
Connect your Ordinal account
On the next screen, click Connect. A browser window opens — sign in with your Ordinal account and approve access. The connector should now show Connected.
Try it out
Ask Claude in any chat: “List my Ordinal workspaces.” Claude should call the ordinal_get_workspace_context tool and return your workspaces.
Troubleshooting
- I don’t see “Add custom connector”: Custom connectors require a Max, Team, or Enterprise plan. Upgrade your Claude subscription at claude.ai/settings/billing. Make sure you’re on the latest Claude Desktop version if you don’t see the option there either.
- The connector won’t sign in: Update Claude Desktop to the latest version — older builds don’t support OAuth-based MCP connectors. Restart the app after updating, then retry from the connector settings.
- I don’t see Ordinal tools in the chat: Open the connector panel in chat (the icon in the message bar) and confirm Ordinal is enabled. If it says Reconnect, click it to re-run the sign-in.
Claude Code
Run the add command
In your terminal, run:
claude mcp add --transport http ordinal https://app.tryordinal.com/mcpSign in with Ordinal
The first time you use an Ordinal tool, Claude Code opens a browser window for sign-in. Authenticate with your Ordinal account and approve access.
Verify the connection
claude mcp listYou should see ordinal listed.
Try it out
Start a Claude Code session and ask: “List my Ordinal workspaces.” It should call the ordinal_get_workspace_context tool.
Troubleshooting
- The sign-in browser window doesn’t open: Update Claude Code to the latest version — OAuth support was added in recent releases. Run the add command again after upgrading.
- My session expired: Claude Code refreshes your token automatically in the background. If that fails, remove and re-add the server:
claude mcp remove ordinalthenclaude mcp add --transport http ordinal https://app.tryordinal.com/mcp.
Codex
Open MCP server settings
In the Codex desktop app, go to Settings → MCP Servers and click Add custom MCP.
Fill in the Ordinal server details
- Name:
Ordinal - Transport: select Streamable HTTP
- URL:
https://app.tryordinal.com/mcp
Leave Bearer token env var, Headers, and Headers from environment variables empty — Ordinal uses OAuth, not a bearer token.
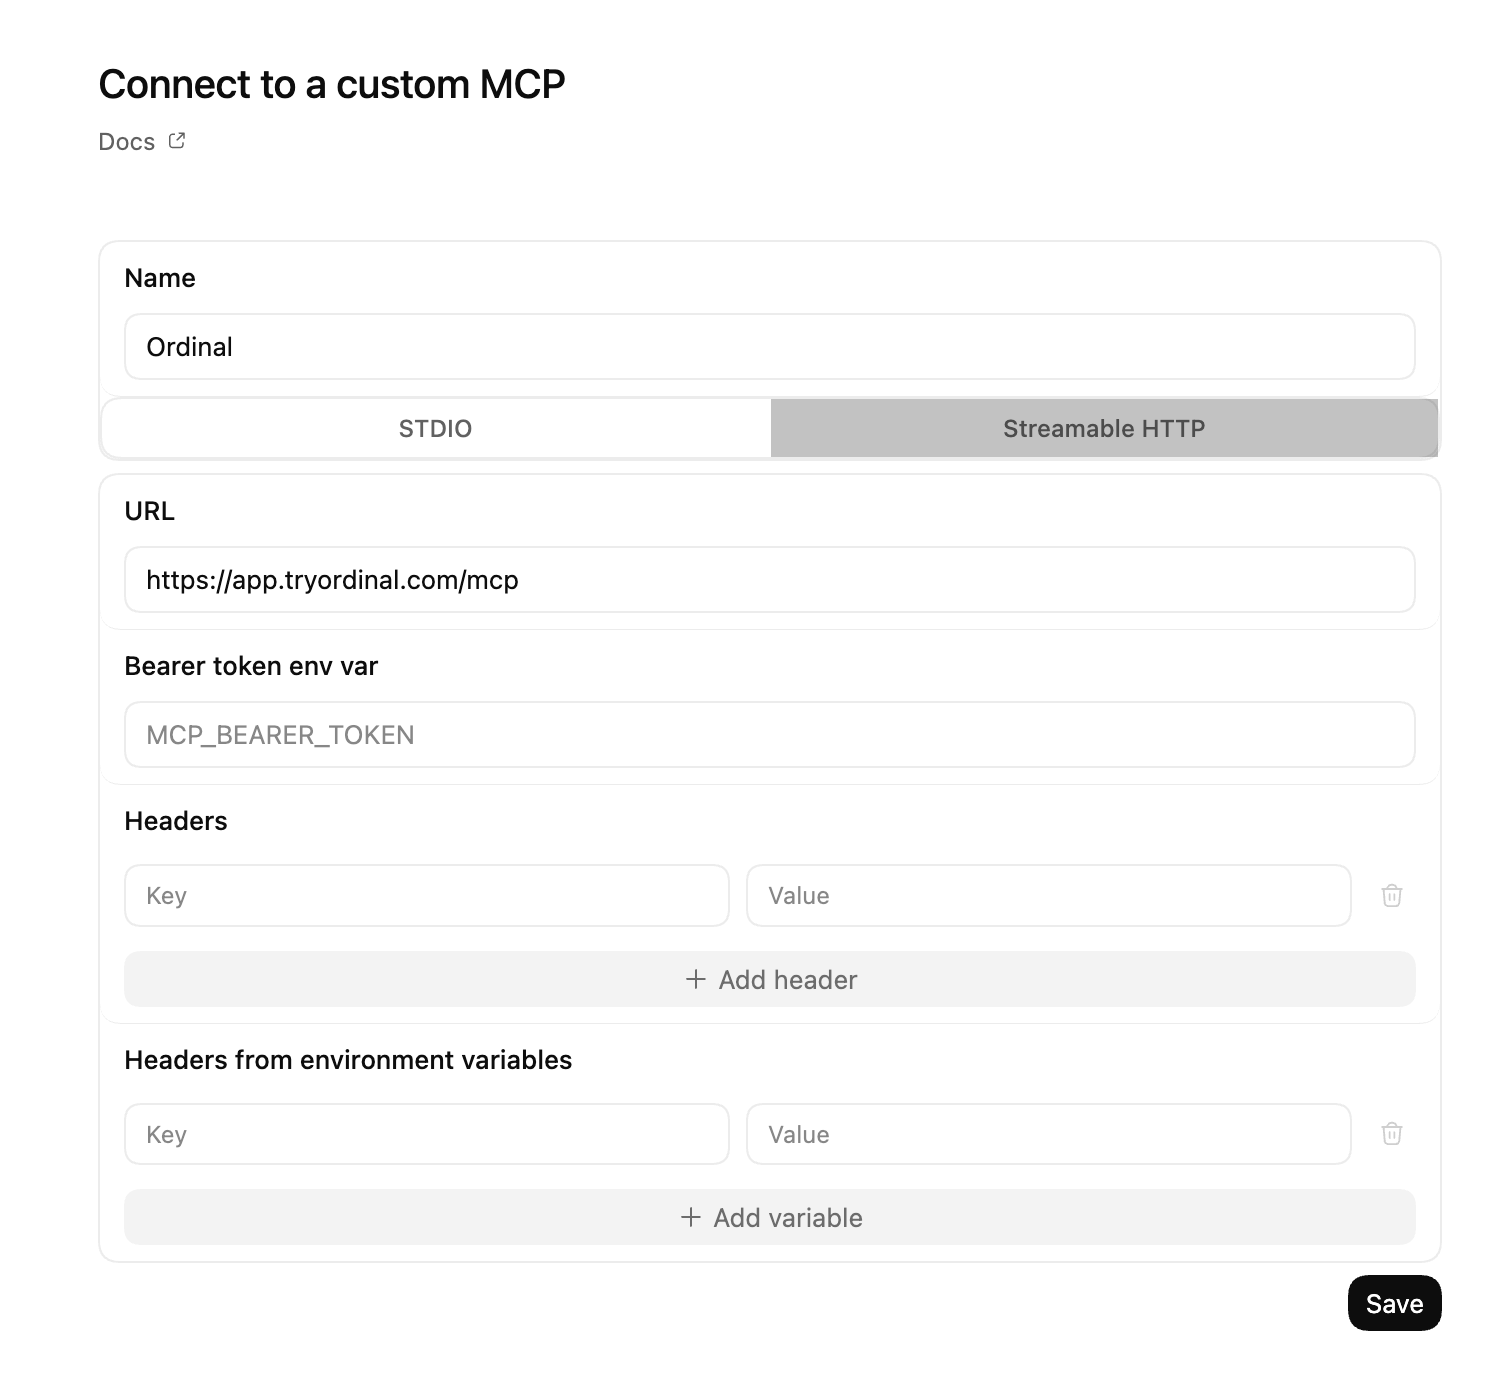
Click Save.
Sign in with Ordinal
Codex won’t trigger OAuth automatically. Just ask Codex in chat: “Authenticate the Ordinal MCP server.” Codex kicks off the OAuth flow and opens a browser window — sign in with your Ordinal account and approve access.
Verify the connection
Back in Settings → MCP Servers, the Ordinal entry should now show as connected and list its tools.
Try it out
Ask Codex: “List my Ordinal workspaces.” It should call the ordinal_get_workspace_context tool.
Troubleshooting
- I don’t see “Add custom MCP”: Update to the latest Codex release — custom Streamable HTTP servers were added in a recent version.
- Tool calls fail with an auth error: Your OAuth token may have expired. Ask Codex to re-authenticate the Ordinal MCP server.
- The sign-in browser window doesn’t open: Make sure Codex can reach
https://app.tryordinal.com. If you’re behind a corporate proxy, configure it and retry.
Codex CLI
Add the Ordinal server
In your terminal, run:
codex mcp add ordinal --url https://app.tryordinal.com/mcpSign in with Ordinal
Run the login command:
codex mcp login ordinalA browser window opens — sign in with your Ordinal account and approve access.
Verify the connection
Inside the Codex TUI, run the /mcp slash command. You should see ordinal in the list of configured MCP servers along with its tools.
Try it out
Ask Codex: “List my Ordinal workspaces.” It should call the ordinal_get_workspace_context tool.
Troubleshooting
codex mcp addsays it’s an unknown command: You’re on an older Codex CLI build without remote MCP support. Upgrade to the latest release and try again.- Tool calls fail with an auth error: Your OAuth token may have expired. Re-run
codex mcp login ordinalto refresh it. - The sign-in browser window doesn’t open: Make sure Codex can reach
https://app.tryordinal.com. If you’re behind a corporate proxy, configure it and retry.
Cursor
One-click install

Install in Cursor
Manual install
Open MCP settings
Open the Cursor command palette (Cmd+Shift+P on Mac, Ctrl+Shift+P on Windows) and search for Open MCP settings.
Add the Ordinal server
In the MCP settings panel, click Add new global MCP server and paste:
{
  "mcpServers": {
    "ordinal": {
      "url": "https://app.tryordinal.com/mcp"
    }
  }
}
Save the file.
Sign in with Ordinal
Cursor detects the new server and opens a browser window. Sign in with your Ordinal account and approve access.
Verify the connection
Back in MCP settings, the ordinal server should show a green dot and list the available tools.
Try it out
Open the Cursor agent panel and ask: “List my Ordinal workspaces.” It should call the ordinal_get_workspace_context tool.
Troubleshooting
- Cursor doesn’t open a sign-in window: Make sure you’re on a recent Cursor version with OAuth MCP support. Restart Cursor after editing the MCP config.
- I see a red dot next to the server: Click the server entry in MCP settings to see the error. Most common causes: your sign-in token expired (click Re-authorize to refresh it), or the URL is wrong (it should be exactly
https://app.tryordinal.com/mcpwith no trailing slash or/api/prefix).
VS Code
One-click install
Install in VS Code
Manual install
Create the MCP config file
At the root of your project, create .vscode/mcp.json:
{
  "servers": {
    "ordinal": {
      "type": "http",
      "url": "https://app.tryordinal.com/mcp"
    }
  }
}
Reload VS Code
Run the Developer: Reload Window command from the command palette (Cmd+Shift+P / Ctrl+Shift+P).
Sign in with Ordinal
The first time you use an Ordinal tool from Copilot Chat, VS Code opens a browser for sign-in. Authenticate with your Ordinal account and approve access.
Try it out
Open Copilot Chat in agent mode and ask: “List my Ordinal workspaces.” It should call the ordinal_get_workspace_context tool.
Troubleshooting
- The one-click button does nothing: Make sure VS Code is registered as the handler for
vscode://URLs. On Windows and macOS, this happens on install; on Linux you may need to associate the scheme manually. If the button still fails, use the manual install steps above. - I use VS Code Insiders: The one-click button targets stable VS Code. If you use Insiders, follow the manual install steps above — they work the same in both editions.
- I don’t see Ordinal tools in Copilot Chat: Open the MCP view in the sidebar and confirm
ordinalshows as connected. If it says Sign in required, click it to run the OAuth flow.
Other AI tools
If your client supports the Streamable HTTP transport with OAuth, point it at:
https://app.tryordinal.com/mcpThen follow the client’s own MCP setup docs. Reach out to support@tryordinal.com if you get stuck.