> ## Documentation Index
> Fetch the complete documentation index at: https://docs.tryordinal.com/llms.txt
> Use this file to discover all available pages before exploring further.
# Scheduling Posts
> Set a publish date and time for your post. Use Ordinal's recommended times for each platform or pick a custom slot.
Scheduling determines when your content goes live. Set a specific date and time, and Ordinal handles publishing automatically - posts go out within seconds of their scheduled time.
 ## Scheduling a post
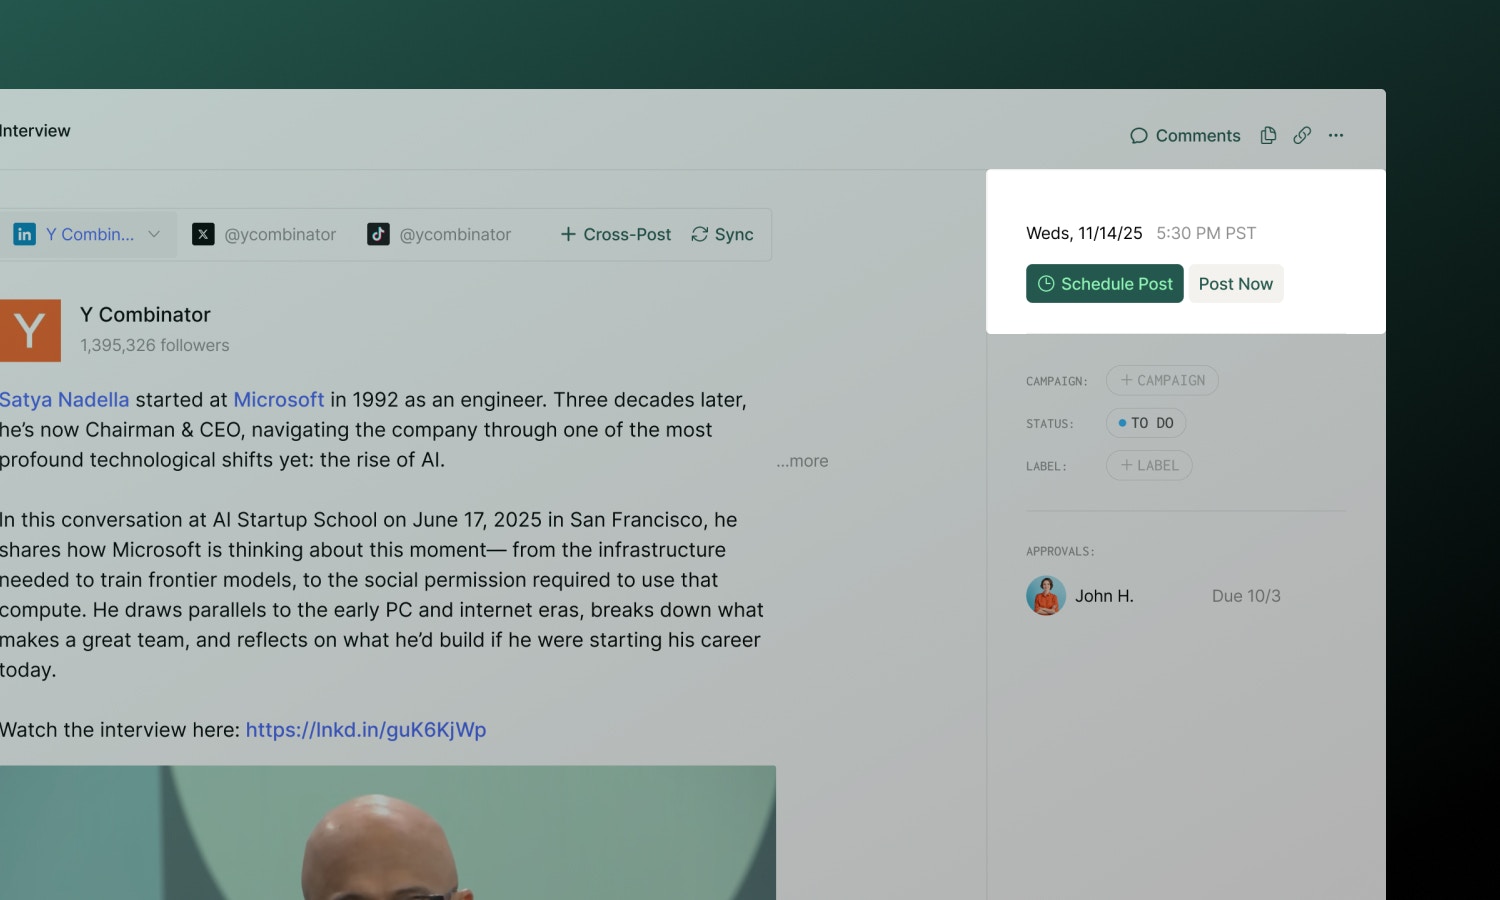
1. Open or create a post
2. In the sidebar, click **Schedule Post**
3. Select your date and time
4. Confirm the timezone matches your workspace settings
Your post moves to "Scheduled" status and appears on the calendar as scheduled.
## Recommended times
When you pick a time, Ordinal suggests optimal posting windows based on the platform and day of the week. Look for the **Recommended** section in the time picker.
How it works:
* Ordinal uses platform-specific optimal time slots (e.g., Twitter performs well 9am–1pm on Mondays)
* Times are randomized within the optimal window to avoid posting at the exact same time as others
* If another post is already scheduled within 20 minutes of a suggested time, Ordinal finds the next available slot
You'll also see **Recently Used** times - your most recent publish times for quick selection.
Recommended times require a workspace timezone. Set this in [Settings → General](https://app.tryordinal.com/settings/general).
## Schedule vs Post Now
Choose a specific future date and time. The post:
* Moves to "Scheduled" status
* Appears on the calendar
* Publishes automatically when the time arrives
* Can be edited until publishing begins
Publish immediately without scheduling. Useful for timely content or when you've finished drafting and want it out right away.
## Rescheduling
To change when a scheduled post publishes:
1. Open the post
2. Click the **Edit Scheduling** button in the sidebar
3. Click the **Edit Scheduling** from the dropdown menu
4. Select a new date and time
You can also drag posts directly on the calendar to reschedule the date. To reschedule the time follow the steps above.
## Unscheduling
To unschedule a post:
1. Open the post
2. Click the **Edit Scheduling** button in the sidebar
3. Click the **Unschedule** button from the dropdown menu
4. The post returns to "Finalized" status
You cannot unschedule a post that's currently publishing or already published.
## Cross-post scheduling
When a post targets multiple platforms, each channel is scheduled and published independently.
### How it works
* In the schedule modal, you can choose which connected accounts to include. Uncheck any channels you don't want to publish yet.
* All channels share the same scheduled time by default. If you need to schedule a different time for another channel, we recommend creating a separate post for that channel specifically (to save time, can use the **Duplicate** functionality).
If you add cross-post channels to an already-scheduled post, the new channels are not automatically scheduled. You'll need to click **Edit scheduling** in the sidebar, and select all the channels (including the new one) to add them to the scheduling.
## CSV bulk scheduling
CSV bulk scheduling is available on Pro plans and supports **Twitter and LinkedIn only**.
Upload a CSV file to create and schedule many posts at once. Find this at [**Settings → Bulk Scheduling**](https://app.tryordinal.com/settings/bulk-scheduling).
### CSV format
| Column | Required | Description |
| -------------------- | -------- | ------------------------------------------------------------- |
| `channel` | Yes | `Twitter` or `LinkedIn` |
| `username` | Yes | Account username (no @ for Twitter, vanity name for LinkedIn) |
| `publish_at` | Yes | ISO 8601 format: `2024-12-25T14:30:00` |
| `copy` | Yes | Post content |
| `first_comment_copy` | No | First comment (where supported) |
### Example CSV
```csv theme={null}
channel,username,publish_at,copy,first_comment_copy
LinkedIn,johndoe,2024-12-01T09:00:00,"Excited to share our Q4 results...",
Twitter,johndoe,2024-12-01T09:30:00,"Big news coming! 🚀",
```
A [Google Sheets template](https://docs.google.com/spreadsheets/d/1Ggg91CzFgk-Scp0Nerb29Lpw3ijD--NuFFwAC0obCSI/edit#gid=0) is available for reference.
Bulk uploads automatically create a campaign named "Bulk Posts \[Date]" containing all uploaded posts.
## Timezone handling
Times display in your computer's local timezone. Hover over any scheduled time to see the conversion to your workspace timezone.
Your workspace timezone is configured in [**Settings → General**](https://app.tryordinal.com/settings/general). This is the timezone used for:
* Recommended time calculations
* Team coordination (so everyone knows when posts go live in the workspace's primary timezone)
## Troubleshooting
Open the post to see error details. Common causes:
* Expired account authorization (reconnect in Settings)
* Platform outage (retry later)
* Content policy violation (review and edit)
Channels added after scheduling aren't automatically included. Open the post and click **Edit scheduling** to add them.
## Learn more
Visualize and manage your schedule.
Understand the full post lifecycle.
## Scheduling a post
1. Open or create a post
2. In the sidebar, click **Schedule Post**
3. Select your date and time
4. Confirm the timezone matches your workspace settings
Your post moves to "Scheduled" status and appears on the calendar as scheduled.
## Recommended times
When you pick a time, Ordinal suggests optimal posting windows based on the platform and day of the week. Look for the **Recommended** section in the time picker.
How it works:
* Ordinal uses platform-specific optimal time slots (e.g., Twitter performs well 9am–1pm on Mondays)
* Times are randomized within the optimal window to avoid posting at the exact same time as others
* If another post is already scheduled within 20 minutes of a suggested time, Ordinal finds the next available slot
You'll also see **Recently Used** times - your most recent publish times for quick selection.
Recommended times require a workspace timezone. Set this in [Settings → General](https://app.tryordinal.com/settings/general).
## Schedule vs Post Now
Choose a specific future date and time. The post:
* Moves to "Scheduled" status
* Appears on the calendar
* Publishes automatically when the time arrives
* Can be edited until publishing begins
Publish immediately without scheduling. Useful for timely content or when you've finished drafting and want it out right away.
## Rescheduling
To change when a scheduled post publishes:
1. Open the post
2. Click the **Edit Scheduling** button in the sidebar
3. Click the **Edit Scheduling** from the dropdown menu
4. Select a new date and time
You can also drag posts directly on the calendar to reschedule the date. To reschedule the time follow the steps above.
## Unscheduling
To unschedule a post:
1. Open the post
2. Click the **Edit Scheduling** button in the sidebar
3. Click the **Unschedule** button from the dropdown menu
4. The post returns to "Finalized" status
You cannot unschedule a post that's currently publishing or already published.
## Cross-post scheduling
When a post targets multiple platforms, each channel is scheduled and published independently.
### How it works
* In the schedule modal, you can choose which connected accounts to include. Uncheck any channels you don't want to publish yet.
* All channels share the same scheduled time by default. If you need to schedule a different time for another channel, we recommend creating a separate post for that channel specifically (to save time, can use the **Duplicate** functionality).
If you add cross-post channels to an already-scheduled post, the new channels are not automatically scheduled. You'll need to click **Edit scheduling** in the sidebar, and select all the channels (including the new one) to add them to the scheduling.
## CSV bulk scheduling
CSV bulk scheduling is available on Pro plans and supports **Twitter and LinkedIn only**.
Upload a CSV file to create and schedule many posts at once. Find this at [**Settings → Bulk Scheduling**](https://app.tryordinal.com/settings/bulk-scheduling).
### CSV format
| Column | Required | Description |
| -------------------- | -------- | ------------------------------------------------------------- |
| `channel` | Yes | `Twitter` or `LinkedIn` |
| `username` | Yes | Account username (no @ for Twitter, vanity name for LinkedIn) |
| `publish_at` | Yes | ISO 8601 format: `2024-12-25T14:30:00` |
| `copy` | Yes | Post content |
| `first_comment_copy` | No | First comment (where supported) |
### Example CSV
```csv theme={null}
channel,username,publish_at,copy,first_comment_copy
LinkedIn,johndoe,2024-12-01T09:00:00,"Excited to share our Q4 results...",
Twitter,johndoe,2024-12-01T09:30:00,"Big news coming! 🚀",
```
A [Google Sheets template](https://docs.google.com/spreadsheets/d/1Ggg91CzFgk-Scp0Nerb29Lpw3ijD--NuFFwAC0obCSI/edit#gid=0) is available for reference.
Bulk uploads automatically create a campaign named "Bulk Posts \[Date]" containing all uploaded posts.
## Timezone handling
Times display in your computer's local timezone. Hover over any scheduled time to see the conversion to your workspace timezone.
Your workspace timezone is configured in [**Settings → General**](https://app.tryordinal.com/settings/general). This is the timezone used for:
* Recommended time calculations
* Team coordination (so everyone knows when posts go live in the workspace's primary timezone)
## Troubleshooting
Open the post to see error details. Common causes:
* Expired account authorization (reconnect in Settings)
* Platform outage (retry later)
* Content policy violation (review and edit)
Channels added after scheduling aren't automatically included. Open the post and click **Edit scheduling** to add them.
## Learn more
Visualize and manage your schedule.
Understand the full post lifecycle.